25 Tips to make your Smartphone Pictures look professional
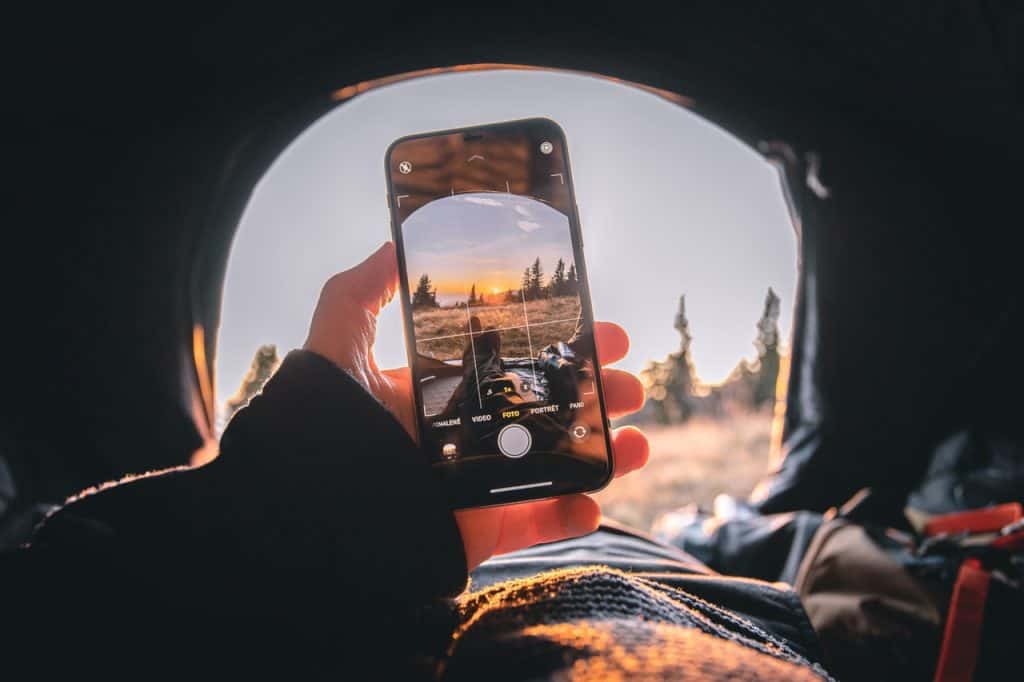
Almost everybody has a smartphone nowadays. It is always nearby, in your pocket, jacket, or handbag. That might be a good reason to say it is the go-to device for taking pictures. Because the best camera is the one you have with you. But how can you go from just snapping pictures to making professional photos with your mobile phone? You’ll be reading all about it in this ultimate smartphone photography guide.
➤ This post may contain affiliate links, purchases made through affiliate links may provide a commission for smartphone photography at no extra cost. Of course, all opinions remain our own. Please read the Privacy Policy for more info.
The gear I used for writing this blog can be found on my favorite gear page.
You will get a more professional look by applying these 25 tips:
- Choose a good camera phone
- Know your camera
- Clean the smartphone lenses
- Use the manual mode
- Shoot RAW
- Use guidelines to apply the rule of thirds
- Bring a tripod
- Use a remote shutter
- Take advantage of external light sources
- Avoid using flash
- Buy smartphone add-on lenses
- Consider using filters
- Use a third-party app for shooting images
- Go for the highest resolution
- Shoot in native ratio
- Zoom with your feet
- Focus on one subject
- Remove distracting objects
- Use the right depth of field
- Benefit from negative space
- Find different perspectives
- Get creative with reflections
- Use leading lines
- Find symmetry
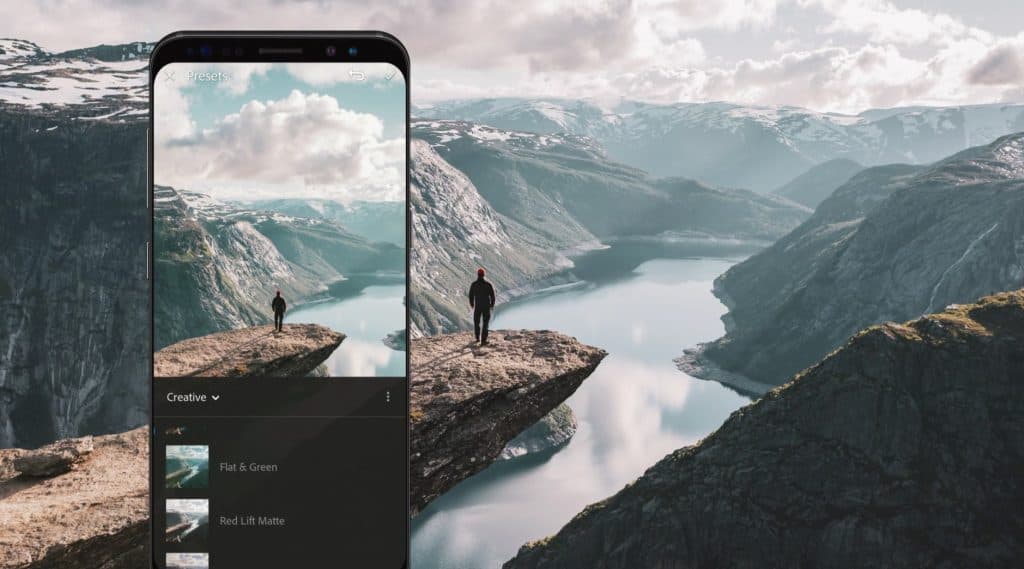
- Edit your RAW photos
There is a lot you can do from becoming an image snapper to taking excellent photographs with your smartphone. But don’t worry. It is not as hard as it seems. Just try to adjust some of these tips, and get to know the possibilities of your phone. We will guide you through the process in this article. Have fun!
1. Choose a good camera phone
Photography is one of the reasons that manufacturers keep on improving smartphones. It all started with a single camera on the back of the phone. Nowadays, high-end devices come with quadruple lenses and a high-resolution selfie camera. The possibilities seem endless. But is a high-end phone the way to go, when you want to improve your photography?
Although flagship devices from, for example, Apple, Samsung, and Huawei, come with pretty impressive photography specs, you won’t need them to create beautiful and professional images. The amount of pixels does not measure the quality of the camera. You should check the:
- Quality of the processor;
- Size of the sensor;
- Amount of megapixels in combination with the sensor;
- Aperture;
- Zoom capabilities;
- Type of lenses;
- HDR support;
The sensor size is one of the most important specs of your camera phone. It is a device that captures light photons as they enter the camera. The processor takes this information to the sensor and uses it to create an image of the subject. Size does matter!
A big sensor can transform a lot of pixels (megapixels) or fewer but big pixels. To make a high amount of pixels work better than a smaller one, you need a better sensor. When you use the same size sensor for higher megapixels, the pixels need to be smaller to fit. Smaller pixels are more affected by noise. Larger pixels collect more ‘good’ data that is required to create a beautiful picture. Therefore a higher amount of pixels does not necessarily mean a better image.
I have put together a buyer’s guide for smartphone photographers. You can download it for free!
Here are a few affordable camera phones for 2020 with decent camera lenses. Are you looking for a professional smartphone camera? Check out our top 3.
2. Know your camera
To create amazing photos with your smartphone, you need to get to know your device. What can it do? Does it have a manual or prod mode so you can set the ISO, white balance, shutter speed, and maybe even aperture yourself? Can you shoot high-dynamic range images? Does it have a portrait mode so you can make beautiful bokeh in the background? Can you adjust the focusing from AF-C (continuous) to AF-S (single) and MF(manual focus?
Just dive into your device and find out what you can and cannot adjust. Try different settings and see what happens to your images. It makes it easier to understand which parameters are responsible for what results.
3. Clean the smartphone lenses
Make sure the lenses of your smartphone are clean. While it is necessary and easy to clean your camera, many people tend to forget it. You can use a lightweight microfiber cloth to clean off dirt, sand, and fingerprints. Because your phone spends a lot of time in your pocket or bag, it may suffer from all kinds of dirt. It can alter the outcome of your images in a very destructive way. Read more about cleaning lenses, creating crystal clear images, and what you need to clean your smartphone camera.
4. Use the manual mode
Most new smartphones come with a built-in manual mode. It might also be called Pro Mode or something similar. Using manual mode gives you full control over ISO, shutter speed, white balance, and in some cases, aperture. It is especially handy in low-light situations. Do not worry if your phone cannot use manual settings; you can download a third-party app like:
5. Shoot RAW
RAW images contain lots more information about the subject and its surroundings than JPEG photos do. This uncompressed, undeveloped, and unprocessed data gives you unlimited opportunities and creative results after using a third-party application or software. You will have more detail in your photos. Besides, you can change colors, lighting, sharpness, white balance, add filters, and much more. You will be in full control of the result. We recommend apps like:
- Lightroom for Android & iOs
- Photoshop Express for Android & iOs
- Snapseed for Android & iOs
- Darkroom for iOs
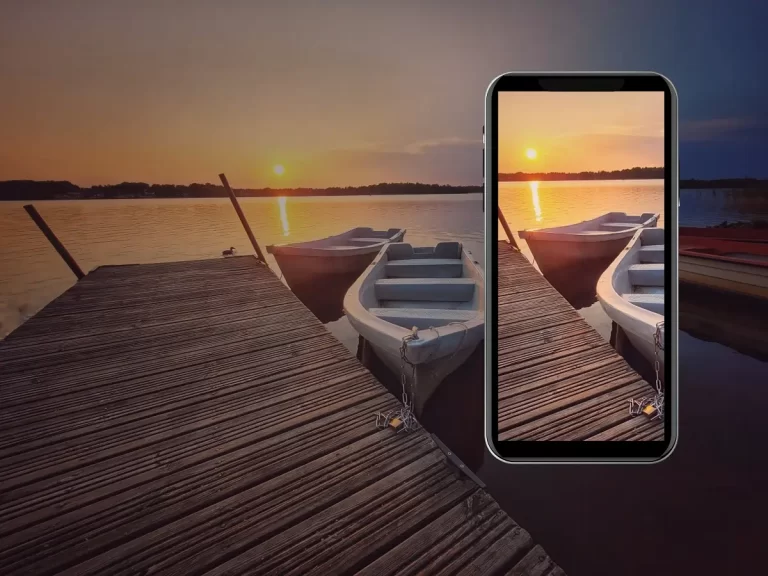
6. Use guidelines to apply the rule of thirds
When using the camera of your smartphone, turn on the guidelines or assistive grid. Choose the nine grid variation; it will give you four intersecting points to easily apply the rule of thirds. The rule of thirds is one of the most common practices in photography. It is quite easy to learn. The four intersections in the grid are where the subject can be placed to create a balanced and ecstatically pleasing picture. In some photographs, you can use more than one intersection or line to apply the rule of thirds. Here are some examples to help you on your way.


7. Bring a tripod
It might sound like a hassle, but bringing a tripod is essential for good photography. Here is why; you won’t be able to hold the phone perfectly still while shooting pictures. You can try using a tree branch or a street light to find balance, but it still is not as stable as a tripod. Any movement, how tiny it might be, can affect the outcome of your image. Especially in macro or low light photography, you have to hold the smartphone very still to get sharp results. A tripod can be your best friend in these situations. You can pick our favorite tripod up from Amazon for a very decent price.
8. Use a remote shutter
Another best friend when it comes to sharp images is a remote shutter. Together with a tripod, you will be able to create crystal clear pictures. With a wireless shutter, you don’t have to touch the camera to take a picture. Tapping the screen causes vibration, which can result in blurry photographs. You can pick up a remote shutter for just a couple of dollars on Amazon.

9. Take advantage of external light sources
A general rule of photography is to put the primary source of light behind you. I might be the sun, a lightbulb, or a street lantern. Look at the subject from different angles and look at what that does to the potential image. Don’t be afraid to experiment with the available light. It can be quite interesting to deviate from the standard norm. For example, you can use a long shutter speed to create light lines from cars passing by.
10. Avoid using flash
Although smartphone cameras keep getting better, there is one thing that still sucks; it’s flash! It can turn a bad image into a worse photo. So don’t use the flash unless you absolutely have to. Results tend to be flat, too bright, and unappealing. Find a light source like a light bulb, street lantern, moonlight, sunset, or any other light source you can find. If you still want to use flash, buy an external flash solution that is capable of giving you beautiful lighting. Or use your camera’s flash only during the daytime.
11. Buy smartphone add-on lenses
External or add-on lenses give you endless creative options to enhance your photography. Many different glasses can be attached on top of your smartphone’s native camera lens. You can choose between wide-angle, fisheye, macro, and telephoto lenses. It is especially impressive when you have a single-camera phone. Nowadays, mid-range and top-end phones have built-in telephoto and wide-angle lenses that can produce the same result. Nevertheless, it is still interesting to look at these types of add-ons. Especially the ones from Moment, they provide top-quality smartphone lenses.
12. Consider using filters
Filters are commonly used in photography, but they are not widely used in smartphone photography. Lots of photographers add a filter after shooting the image by using apps like Lightroom. We always say, shoot the best photograph possible, then start editing. Start looking for polarizer and neutral density filters; they will enhance the quality of your images. You can manipulate light, reduce glare in reflective situations, and look into the water. It also allows you to increase or decrease contrast and reduce haze.
Moment has excellent smartphone filters in their online shop which you can use on your camera phone with a phone filter mount. It works with any standard 67mm filter.
If you are on a budget, you can consider buying the Apexel Filter Kit or Neewer Clip On Filter. The Apexel Lens Kit comes with 7 different lenses including an ND, CPL, and blue filter. The Neewer Clip On ND Filter has a maximum focal length of 37 mm and is compatible with many smartphones.
13. Use a third-party app for shooting images
If your phone does not come with a native app that can shoot RAW or has a Manual Mode, try a third-party app that can. Your phone has to be camera2api ready if you want to adjust ISO, shutter speed, and focus manually. Try these apps for Android and, or iOs:
- Camera FV-5 Lite for Android
- Open Camera for Android
- ProCam X – Lite for Android
- ProCam 7 for iOs
- Camera ZOOM FX Premium for Android & iOs
14. Go for the highest resolution
Choose the highest resolution possible to guarantee high-quality images. It usually means shooting in the native ratio settings 4:3. Choosing a different ratio means you will crop the image. It is always better to crop the photograph after taking the picture.
15. Shoot in the native ratio
As we explained in the previous tip, you should use the native ratio of your camera phone. It usually means shooting in the ratio 4:3. You can crop and change it later when you are editing the images.
16. Zoom with your feet
Never, ever use the digital zoom of your smartphone camera. The zoom function of your phone does not work the same as the zoom function in a DSLR camera. The digital single reflex cameras have an optical zoom. The lens adjusts its inner elements so it can increase or decrease its focal length. The digital zoom of your smartphone cannot do this. Instead, it just zooms and thereby crops your photo to appear the subject to be closer. Get as close to the object as you can to get the same result your would by using the zoom.
17. Focus on one subject
Many great images include just one interesting object. Don’t let the subject fill the entire frame, but leave some negative space. A good rule is about two-thirds of the photo. Your subject will stand out even more while applying this rule. You will have to focus on your object manually. Try to take pictures with a shallow depth of field and some pleasing bokeh; it helps your subject stand out even more.
18. Remove distracting objects
Take some time prepping the scene before taking pictures. When possible, remove distracting objects. Look at the background as well; it might be too busy and prevents your subject from standing out. Try a different angle.
19. Use the right depth of field
Depending on the subject, you will have to choose a depth of field. Does the photograph benefit from a shallow depth of field like in portraits or macro photography? Or do you need a large DOF for a stunning landscape image?

20. Benefit from negative space
Try using a lot of negative space in your images. The subject will stand out even more. It can take a photo from average to standing out. You can find negative space in a clear blue sky, an open field, a huge wall of a building, or any large objects that surround your subject.
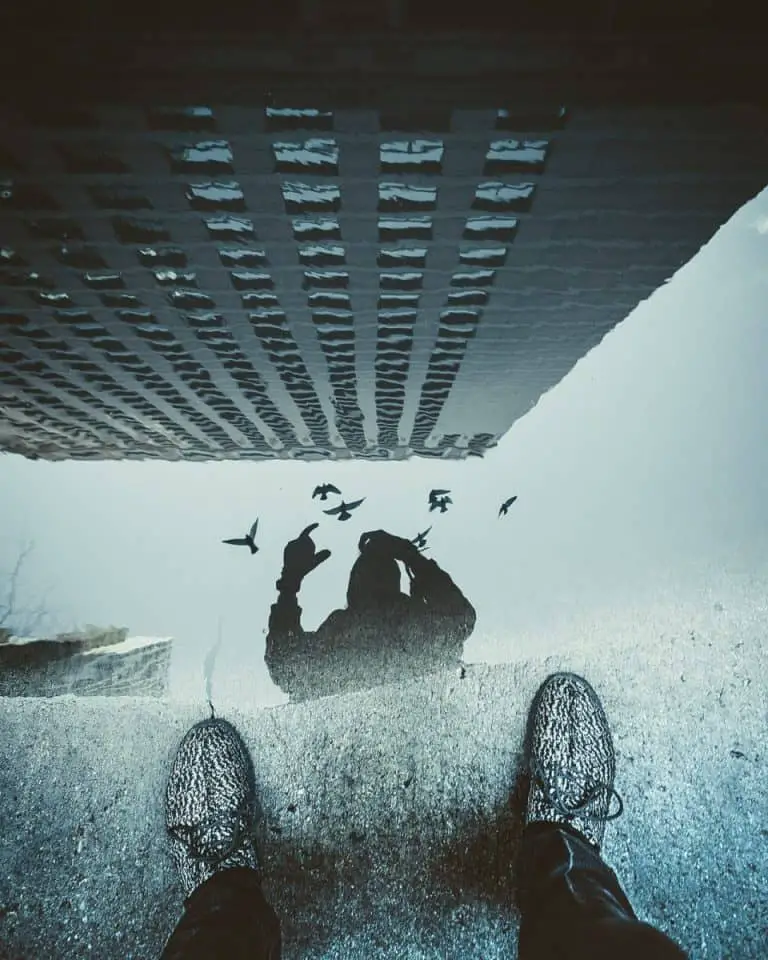
21. Find different perspectives
Do not just take pictures from eye level. It is something that happens quite easily but does not guarantee the best images. Try kneeling, squatting, or lying on your stomach, use a tripod to get higher, stand on a box, or climb a tree (carefully). It will result in interesting perspectives like a birdseye view.
22. Get creative with reflections
Take a picture of a building in a rainwater pool, a sunset in the rearview mirror of your car, or a reflection of a person in the window. It gives you great new and creative perspectives. Try looking at your environment differently, use reflecting objects to create interesting scenery. Think of sunglasses, metallic surfaces, and drinking glasses.
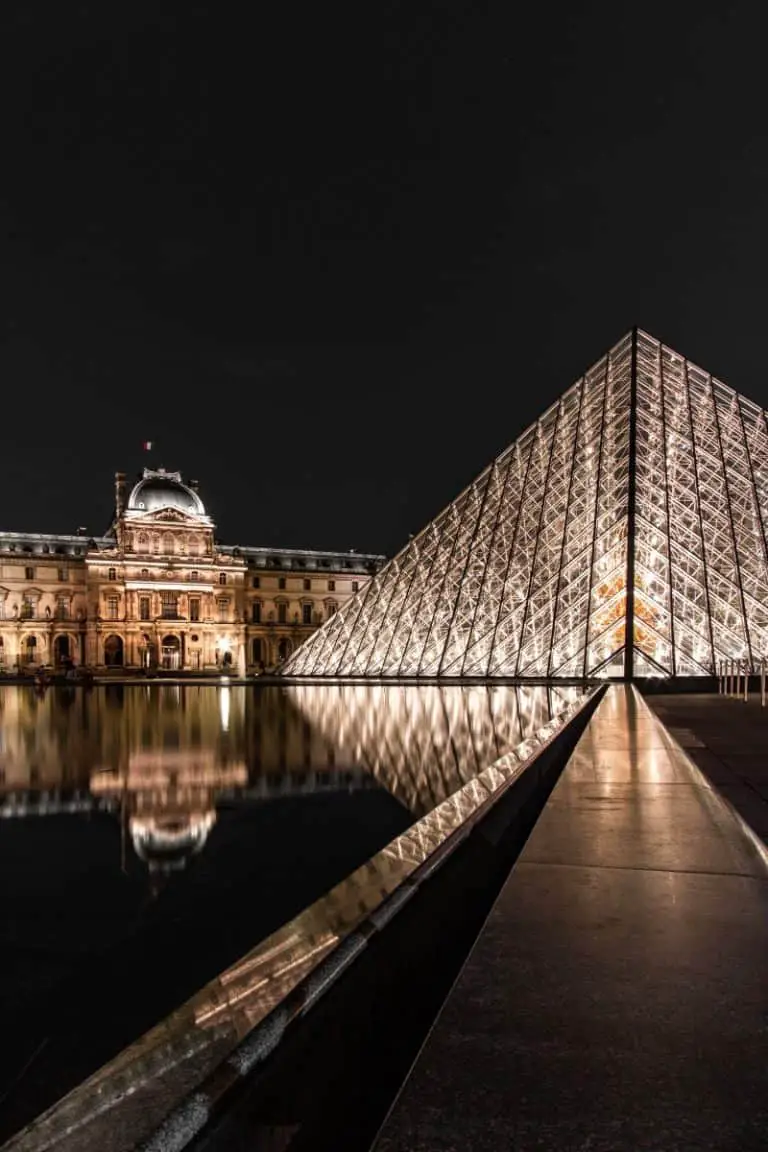
23. Use leading lines
Use (imaginary) lines to attract the viewer’s eye to the subject in your photo. It can be a road, the shape of a building, bushes in the forest, or staircases on a railway station. The lines can be straight or circular, as long as they draw the eye to the main object of the image. Leading lines will create a sense of depth and make it more powerful.
Look at this example from the Louvre in Paris. The walkway and the old building behind the pyramid all lead to the bright lights inside the glass pyramid.

24. Find symmetry
Symmetry gives balance and peace to an image. It is aesthetically pleasing to look at the result. It is a straightforward tip to apply. Symmetry means that you can divide the photo into two halves. You should be able to put a mirror in the middle and have the same result. So it is not the same as using reflections. Guidelines come in very handy while shooting symmetry.
25. Edit your RAW photos
After composing and taking your favorite images, you are not done yet. You still have to edit your RAW photos in a third-party app or software. Even if you decided to take JPEG images, you could adjust the outcome to your liking. For some basic adjustments, you can use the native photo editing app on your phone. But if you want professional results we recommend using one or more of these applications:
- Lightroom for Android & iOs
- Photoshop Express for Android & iOs
- Snapseed for Android & iOs
- Darkroom for iOs
- VSCO for Android & iOs
One crucial tip is, do not overdo it. Do not go overboard with color corrections and light adjustments. It is not pleasing to the eye. Keep it subtle. Try experimenting, but always keep your original raw files so you can try again. Try to find a method that fits your personality as a photographer and keep it throughout your images. It will create a balance in your portfolio.
Did you make professional-looking photos?
Yes, we know that was quite the article. We hope you will be able to apply some or all of the mentioned tips. It will improve your smartphone photography. Are you ready for professional results? You can find more tips in our Learn section of this website. You can read more about macro photography, applying bokeh, and how to use a tripod with your camera phone.
On our recommended gear page you can find some helpful accessories that will lift your photography to the next level.