The Best 3 Smartphone Photo Editing Apps for Android and iOS in 2021
Over the past few years, the number of mobile photography apps has been overwhelming. You don’t need to worry. We have put together a list of Smartphone Photography Applications you should not miss. Our favorite three apps are included. You will up your photography game once you know how to make beautiful compositions and make your images look fantastic.
Most photography apps may not necessarily be as good as the image-editing software of desktop programs, but they are pretty inventive nowadays. They are also cheaper, always available on the go, and sharing your creations was never easier.
Today’s smartphone cameras are packed with more megapixels and sensitive sensors. Developers and manufacturers are continually trying to close the gap between phones and DSLR cameras. Together with the right editing app, you can get stunning results that will wow your audience.
Let’s dive into the app jungle of photography.
➤ This post may contain affiliate links, purchases made through affiliate links may provide a commission for smartphone photography at no extra cost. Of course, all opinions remain our own. Please read the Privacy Policy for more info.
The gear I used for writing this blog can be found on my favorite gear page.
Overview of our top 3 Photography Apps
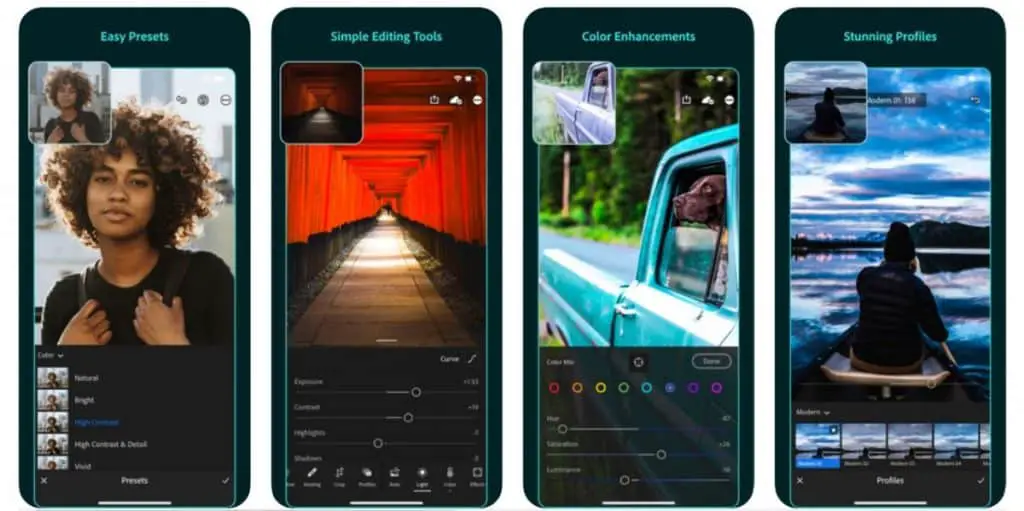
Adobe Lightroom
Adobe Lightroom Photo Editor & Pro Camera is the mobile variation of the Lightroom software. You can download the application for free in the Google Play store for your Android phone and in the Apple Store for your iPhone or Apple device.
What can I do with Adobe Lightroom?
A more straightforward question might be: ‘what can’t I do with Adobe Lightroom?’ You can manipulate your images, preferably RAW photos, very extensively. You will get almost all of the tools of the desktop version of Lightroom CC Plus. It looks and feels pretty much the same and gives you much more control than the default smartphone camera app on your phone.
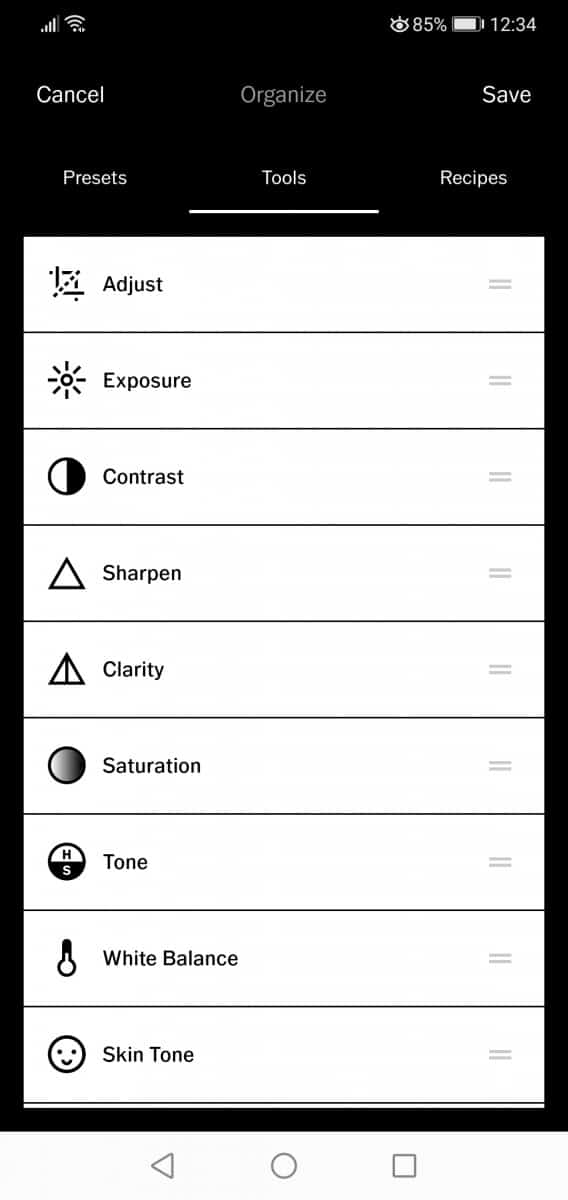
Lightroom Editing features:
- Tonal adjustments like exposure, contrast, highlights, and shadows.
- Color adjustments like temperature, tint, vibrancy, and white balance.
- Curves adjustments
- Add clarity and dehaze effects
- Correct perspective, distortion and remove spots and blemishes
- Apply custom profiles and presets
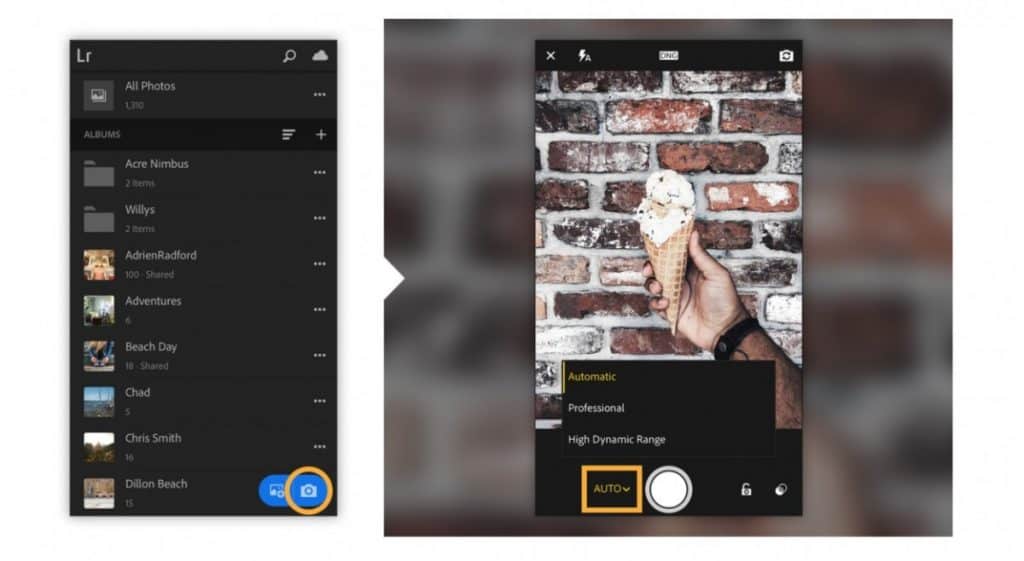
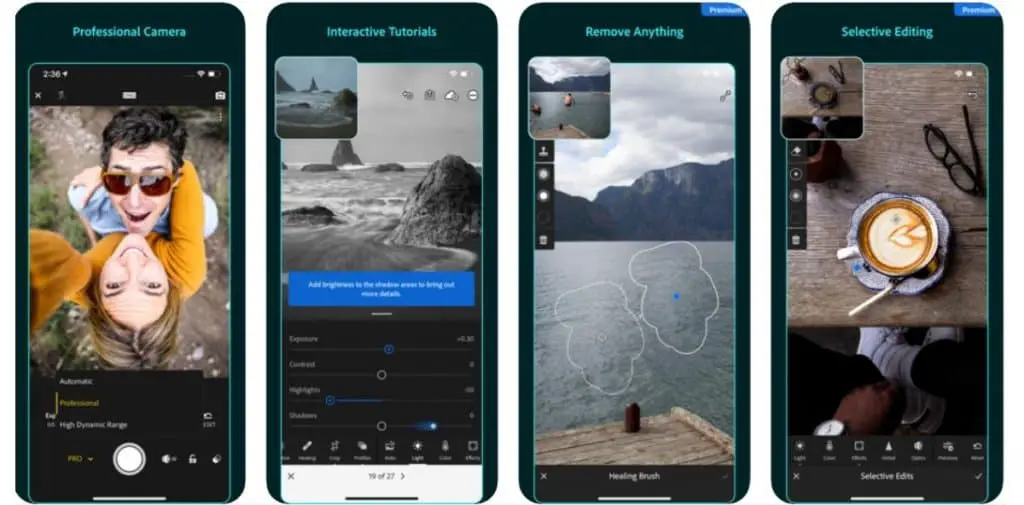
There’s also a built-in camera mode that offers RAW support and Pro Photography Mode.
Lightroom Camera features:
- RAW image format (DNG Digital Negative)
- Pro Mode
- White balance
- ISO values
- Focus settings
- Shutter speed (up to 5 seconds, handheld thru image stacking)
- Exposure compensation (lines for overexposure)
- Crop ratio
- Gridlines
- Timer
Why should I choose Adobe Lightroom Mobile?
There are several reasons why Adobe Lightroom Mobile is one of the top apps for mobile photographers.
- Lightroom Mobile supports non-destructive editing. Which means you can always undo every single edit on any device, at any time. Even after you closed and reopened the app.
- Lightroom supports selective adjustments to certain parts of your photo. It is convenient to use with a tablet and a digital pencil.
- You can create and apply presets you have saved to your Lightroom Desktop software.
- The app correctly handles metadata like keywords, title, copyright to your photographs.
- The user interface is intuitive and makes editing easy.
- You can create web albums that you can share with your clients, partners, and friends. It is possible to protect a specific web album with a password.
- It comes with a professional camera mode with RAW image options.
Is Adobe Lightroom Mobile free?
Well, yes and no. The apps are downloadable for free, but not all features will be available. You can purchase a monthly or yearly prescription to unlock all premium features.
You can download the Adobe Lightroom Mobile app for free, but not all features will be available. Premium membership costs $54.99 a year (or $5.49 a month).
So what is the difference between Lightroom Mobile Free and Premium version?
We have put together a table to give you a quick answer to that question.
| Feature | Lightroom Free | Lightroom Premium |
|---|---|---|
| Exposure | Yes | Yes |
| Highlights | Yes | Yes |
| Shadows | Yes | Yes |
| Blackpoint | Yes | Yes |
| Color Temperatur | Yes | Yes |
| Color Tone | Yes | Yes |
| Color Dynamic | Yes | Yes |
| Saturation | Yes | Yes |
| Texture | Yes | Yes |
| Clarity | Yes | Yes |
| Remove Haze | Yes | Yes |
| Vignette | Yes | Yes |
| Denise | Yes | Yes |
| Sharpen | Yes | Yes |
| Add Grain | Yes | Yes |
| Cropping | Yes | Yes |
| Black and White | Yes | Yes |
| Edit RAW Files | – | Yes |
| Selective Adjustments | – | Yes |
| Presets | – | Yes |
| Repair Tool | – | Yes |
| Perspective Correction | – | Yes |
| Syncing | – | Yes |
| Web Galleries | – | Yes |
| Sensei Search | – | Yes |
| People View | – | Yes |
| Adobe Spark | – | Yes |
| Portfolio Website | – | Yes |
| Adobe Fonts | – | Yes |
How to edit photos like a pro with Lightroom Mobile
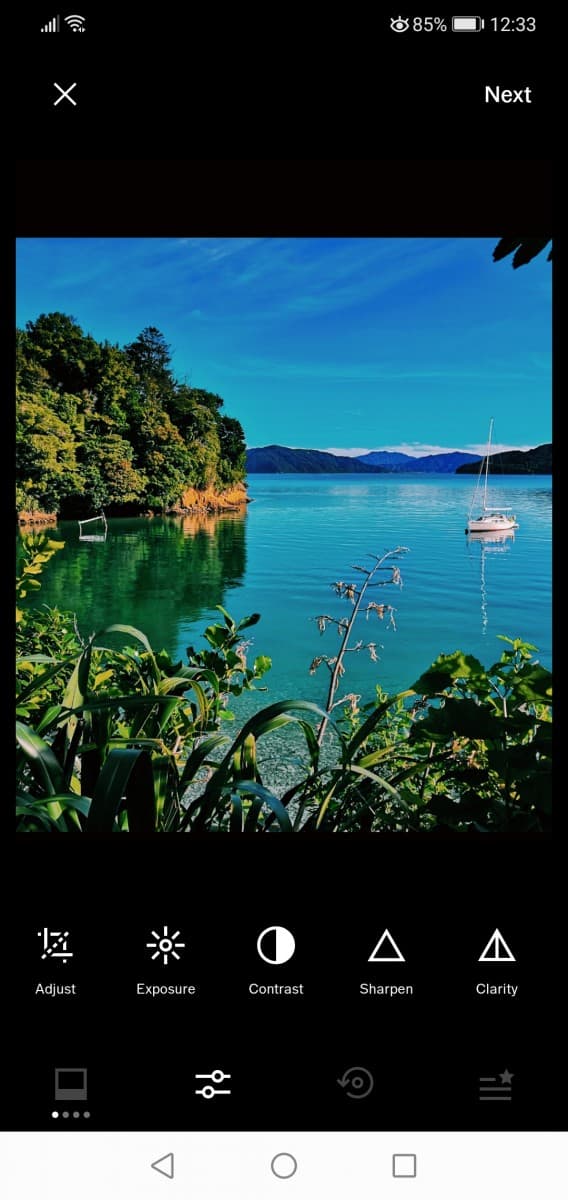
Follow our simple Adobe Lightroom Mobile photo editing techniques and go from a simple snapshot to a professionally taken and well-edit masterpiece. Be aware; these are our steps to manipulate the image; there are many different ways to approach this. We think these 17 steps are easy to follow even for beginners.
- Upload and open your image to Adobe Lightroom Mobile app.
- Straighten the image and crop it to the desired size.
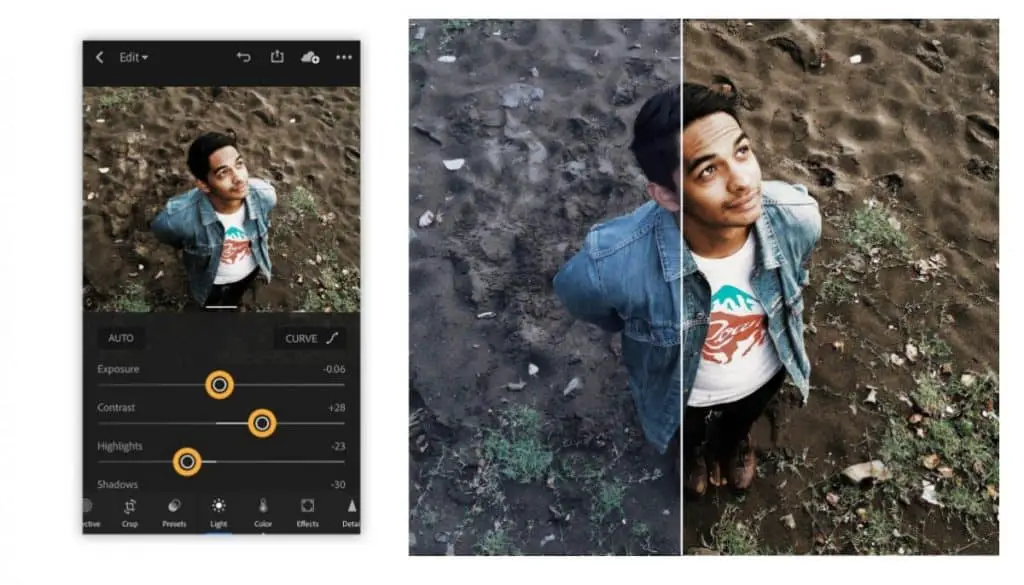
- Adjust the exposure in the light settings; you can use AUTO as a guide.
- Adjust the contrast.
- Bring down the highlights; you will get a lot more detail.
- Bring shadows up or down, so the darkest parts of the image are barely losing detail.
- Adjust the whites and blacks to bring back detail.
- Go to the color panel.
- The AUTO setting for white balance usually does a pretty good job, but you can change it here if you need to.
- Go to vibrance and add a bit of vibrance to boost color if you like. Don’t overdo it, though; it gets fake too quickly.
- You can dial down the saturation a bit to compensate for a bit more vibrance. Just play around with it and see what kind of color settings you prefer.
- Under the MIX tab, you can change colors in a more detailed manner. Change hue, saturation, and luminance in the eight different color categories. Keep it natural, especially the luminance, and repeat this for every color throughout.
- In the Effects tab, you can change the texture of your image. You can use clarity and dehaze on your photo. Be careful; these sliders will change the idea of the photograph pretty quickly.
- You can also add a black or white vignette. We are generally not a fan of white vignettes, but you can give them a try. A black vignette will provide the photo more focus on the subject.
- In the Detail tab, you can sharpen the image, bring back more detail, and use noise reduction.
- Save the changes to your image and share it with the world.
- (You can even remove unwanted objects in your photographs with the Healing tool).
You can change many more settings, but the changes mentioned above are pretty easy to make and will change your image dramatically for the better.
Useful tips and tricks for Adobe Lightroom Mobile
- When using any slider, tap on the left (label) or right of the slider to decrease or increase the value. This way, you can make subtle changes in the given values.
- Double-tap on the slider (circle) to reset the values to zero.
- Tap and hold a photo with one finger to view a before editing version of your photograph.
- You can see highlight and exposure clipping on your mobile screen by dragging the slider with two fingers. Some phones work differently, and you have to adjust the slider with one finger and tap on the image with another.
Reviews and reaction from Lightroom users
You might have figured out that we are a fan of Lightroom Mobile. Let’s see what other users think. Here are a few recent reactions we found in the Google Play and Apple Store.
“Awesome app for editing for beginners, and experts will also love this!”
“This is a great app; it works perfectly for me and my work style!”
“This is very helpful for mobile photo editing. You can create stunning results without the use of a DSLR camera and PC software.”
“Lightroom CC is the future of photography. Pretty much all the tools I need are included. The RAW camera for the iPhone is incredible, plus the cloud syncing makes my workflow a breeze. On top of that, the updates just keep bringing more and more great features, proving they are truly putting your subscription money to good use. Great stuff.”
“Everything about the editing portion of the app is great. My mobile workstation is complete! Thank you, Adobe Lightroom, developer team.”
Is Lightroom Mobile Premium worth it?
Adobe Lightroom Mobile has become the primary editing and photography app for many smartphone photographers. For $4.58 a month (with a yearly subscription), it is well worth the money spend for someone who wants to become a photographer that stands out from the digital crowd. So yes, in our opinion, it is worth it. You can download the app for your Android phone or iPhone.
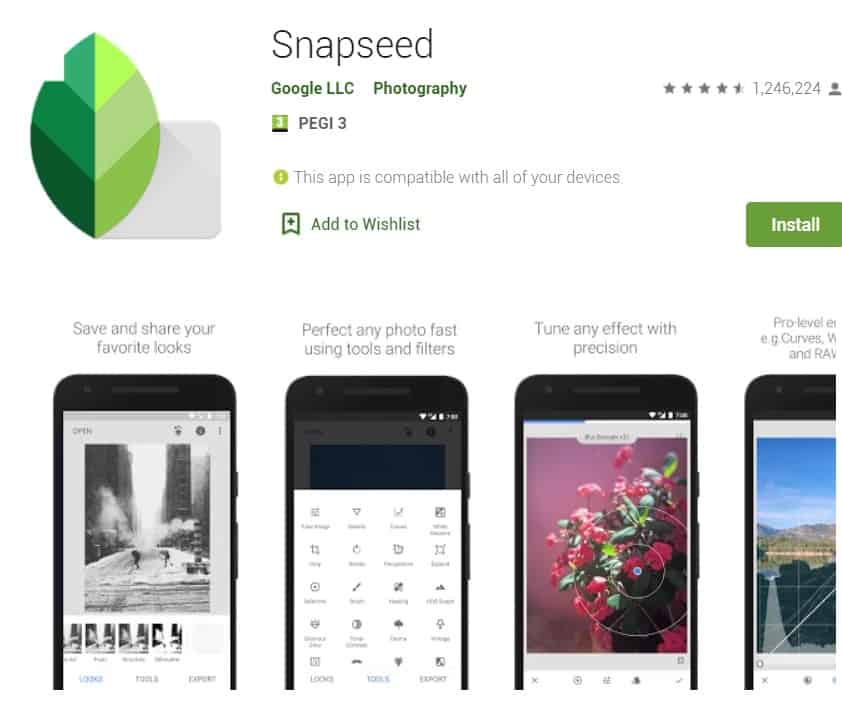
Snapseed
A question a lot of smartphone photographers ask, is Snapseed as good as Lightroom? The short answer is NO. But it is a relatively straightforward application to use and, therefore, perfect for beginner smartphone photographers and editors. Here is why.
What can I do with Snapseed?
You can download Snapseed for free in the Google Play store for your Android phone and in the Apple Store for your iPhone or Apple device.
Snapseed is a professional photo editor developed by Nik Software and is now owned by Google. It enables you to enhance photos and apply digital filters. The image manipulation software tools and presets are relatively easy to use.
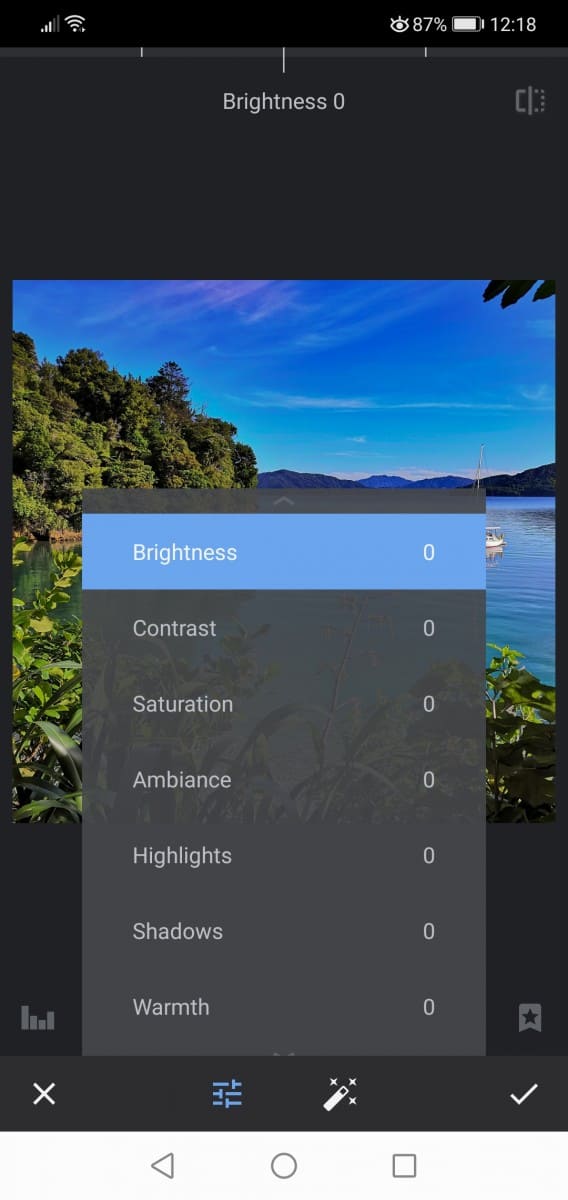
The app allows you to fine-tune your image by changing brightness, saturation, contrast, curves, and shadow values. You can even edit RAW photos straight from your phone.
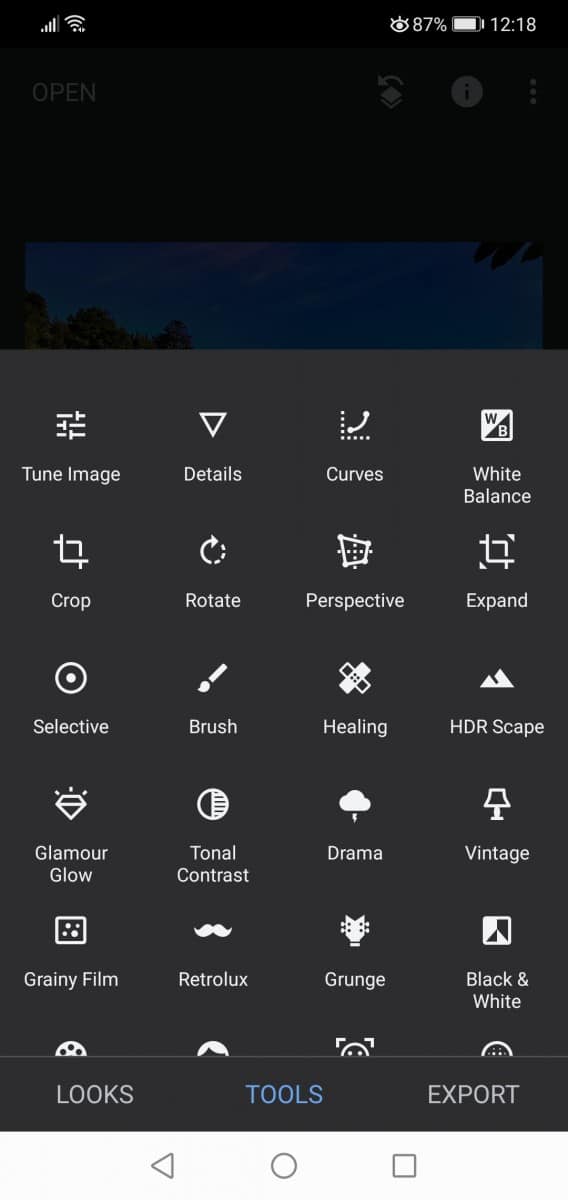
Snapseed features:
- Opens JPG and RAW files
- Save personal preferences and look for later.
- Professional tools and filters
- Add vignettes, lens blur, glamour glow, and tonal contrast.
- Editing is non-destructive so that you can go back to your original image.
- It’s free!
Why should I choose Snapseed?
The first and foremost reason to install Snapseed is its price; it is free! Secondly, the interface is relatively easy to use and understand. For a free app, we think it has a lot more pros than cons. You can’t go wrong here. Snapseed has the most commonly needed editing tools for smartphone photographers.
Which is better, Snapseed or Adobe Lightroom?
Lightroom Mobile is better for photographers who would like to have full control over their images. Snapseed is an excellent free app to edit photos for beginners. Here is why.
File type
Both applications can manipulate JPEG and RAW files. Lightroom handles the RAW files a bit better than Snapseed, but there are no significant differences.
Easier to use
Snapseed is better for absolute beginners. Options are clear. There are fewer sliders and buttons to worry about. So our advice is to start here when you are new in smartphone photography and editing.
Editing
Lightroom comes with more advanced features, and you can take more control of the features. It merely has more in-depth options. Snapseed is a quick photo and text editor for beginner photographers and when you are on the go and want to edit and share your results quickly.
Presets
Snapseed has some built-in presets that you can edit to your liking. Lightroom has presets as well but also offers you external preset options. Again, Lightroom has more advanced options than Snapseed.
Price
You can find both applications in the Android and Apple stores for free. But you won’t be able to use some premium features of Lightroom without a monthly subscription. You will pay $4.58 a month (yearly subscription) to access things like selective editing.
So it depends on what kind of editing you are interested in. We recommend using both apps. If you have time and want to edit your RAW files in-depth, then we would recommend Lightroom. When you want to edit and share your image quickly, choose Snapseed.
How much does Snapseed cost?
You can download Snapseed for free in both the Android Play Store and the Apple App Store. There are no monthly or yearly costs to use the application to access all features of the app without payment.
How to edit photos with Snapseed?
There are many different ways to use photo editing apps; here is one of them.
- Straighten the image with ‘perspective.’
- Crop the image to the desired size.
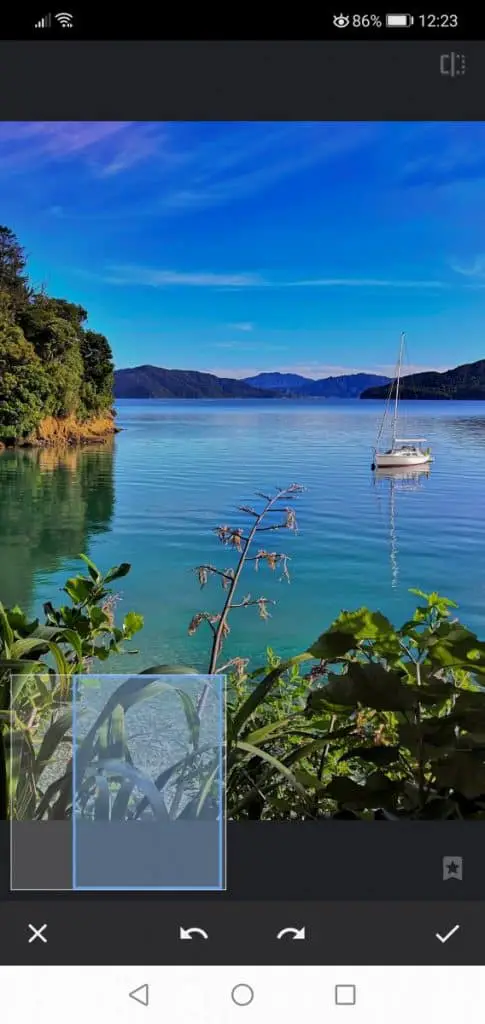
- Remove unwanted objects with the ‘healing’ tool.
- Tune the image with brightness, contrast, and saturation.
- Lower the highlights to create more contrast in, for example, the clouds.
- Change the shadows depending on the mood in the picture.
- Adjust the white balance to create a particular atmosphere like a warm look.
- Alter the curves of the three colors (red, blue, green)
- Play with the structure and sharpness. Please don’t overdo it; you want the changes to look natural.
- Add some local changes by using the ‘selective’ and ‘brush’ mode.
- Save the changes and share your stunning images with the world.
You can change many more settings, but the changes mentioned above are pretty easy to make and will change your image dramatically for the better.
Useful tips and tricks for Snapseed
- Use the healing tool to remove unwanted objects from your image. See an example in the pictures above we took in New Zealand. The leaves magically disappear in the upper right corner.
- You can add text to your images before sharing them on social media. There are many fonts, styles, and sizes available from the library. Add an extra layer with the same text to create a shadow behind the text.
- Try the alternative for vignetting, blur.
- Give HDR scape a try to create a High Dynamic Range type of images.
- You can even create b images with Snapseed.
- Use ‘ambiance‘ under ‘tools,’ and ‘tune image’ for a warm, clear, and light ambiance.
Snapseed does not automatically save changes, so make sure you tap the export button to apply your edits.
Reviews and reaction from Snapseed users
Snapseed has a large fan base among professional smartphone photographers. They might even call it the must-have photography app of 2020. Many users claim they hardly use Photoshop because of the possibilities Snapseed has to offer. Here are a few reviews of fellow users.
“It’s an awesome app! I’ve been using it for the last three years, and I faced no issues.”
“Bravo! Absolutely one of the best free apps I’ve ever used. I take my hat off to these people for not showing ads and letting us ‘not so techie’ people use a great simple photo editor.”
“I found this app very useful. It helps me enhance my photography skills. You don’t need different apps for editing; just this one is enough. The best thing is it’s free of ads.”
“Snapseed is the perfect and handy app for mobile editing. And most important is it’s available for free. It has covered all the editing tools which are not even available in others.”
Is Snapseed available for PC?
Snapseed is not officially available for PC or Mac. It is only downloadable for Android and iOs devices. But there is a way to use the Snapseed application on your personal computer. Download the Android application for Windows and Mac for free.
How can I use Snapseed on my laptop or PC?
The process of downloading this application for your PC is a bit difficult. Here are a few steps you must follow:
- Download an Android Emulator; this is free software that allows you to install Android applications on your PC. You can try BlueStacks or Nox App Player.
- Open the Android Emulator.
- Enter your account information, and you will be able to use Google Play Store on your PC.
- Click on the App Center option on top of the screen.
- Search for Snapseed and click install.
After you have installed Snapseed, you can click ‘open.’ This will open the Snapseed app.

VSCO
VSCO is a mobile photography app for both iOS and Android devices and stands for Visual Supply Company. You can import photos and short videos and edit them with various preset filters and an extensive toolkit.
What can I do with VSCO?
With VSCO, you can edit and apply filters to your photos and share them on its own and other social networks. It has a minimal and intuitive interface that needs just a little time to get used to. You can also use VSCO as a camera app to shoot pictures in the app’s Studio mode with your iPhone. There are not a lot of options for taking photos while using an Android phone.

VSCO Editing features:
- Exposure and contrast
- Crop, Rotate, Straighten image.
- Sharpen
- Clarity
- Saturation, tone
- White balance
- Vignette
- Split tone, grain, fade
- Borders
- HSL tabs (Hue, Saturation, and Lightness)
- Change or delete individual edits
VSCO Camera features for iPhone:
- Camera Auto settings
- Camera Manual settings, DSLR like
- Exposure compensation
- Shutter speed
- ISO
- White balance
- Manual focus
- Gridlines and tiltmeter
- Flash
- RAW support for editing (from iPhone 6 and newer also shooting in RAW format, unfortunately not available on any Android device at this time)
The VSCO Camera has more manual controls than the iPhone’s native camera app. If you want to change the white balance, shutter speed, ISO, and manual focus, you should use an app like VSCO.
Is there a free version of VSCO?
There is a basic free version of the VSCO video and photo editing app for Android and iPhones. You will need to create a Google account to use the app. It is their preferred method, but there are other log in options available, though. There’s also a premium subscription available.
How much does VSCO cost?
The basic version of the VSCO app is free. You only need an account to log in. Premium membership costs $19.99 a year, which is $1.67 a month. It will unlock all available camera, photo, and video editing features. You can also start a free 7-day trial to see if you enjoy using VSCO.
We have put together a table describing the difference between VSCO free and premium.
| Feature | VSCO Free | VSCO Premium |
|---|---|---|
| Basic VSCO presets | Yes | Yes |
| Standard editing tools | Yes | Yes |
| 200+ VSCO presets | – | Yes |
| Advanced photo editing tools | – | Yes |
| Video editing tools | – | Yes |
| Video montage | – | Yes |
| Weekly photo challenge | – | Yes |
| Bonus content for members | – | Yes |
How to edit photos with VSCO?
- Import your photo from your camera roll
- Open the image
- Choose a preset that you like (you can add them to your favorites)
- Click on the slider tap to adjust the picture.
- Choose an aspect ratio (if you want to change them)
- Adjust the exposure and contrast
- Next, you can sharpen to image (don’t overdo it, because it gets grainy fast)
- Change the clarity, the highlights. And shadows in the photos.
- Add a vignette to your photo; again, don’t overdo it.
- Adjust the white balance if your image is too yellow, green, or blue. Or even make it warmer or cooler if that is what you are looking for.
- Change the color intensity with saturation.
- Adjust HSL for every color in your image. For example, change the hue, saturation, or lightness of the blue color.
- Save your photo and share it with the world. You can save your settings into a ‘recipe.’
Useful tips and tricks for VSCO
- Adjust the intensity of the filter. VSCO is known for its subtle filters that won’t overpower the original image. You can even adjust the filter according to your preference.
- Try the Film filters on your photographs. They work best with RAW photos. You can take RAW images with the VSCO app if you have an iPhone 6 or higher.
- Layer the filters. Yes, you can use more than one filter on your favorite pictures.
- Straighten or tilt your images with the adjustment tool. You can even tilt horizons, shorelines, and walls.
- Long-press on your photo to see the before and after result.
- Create your own recipes to access your personal presets quickly and easily. Use the recipes icon (circle with arrow around it) to add a new one. To delete a recipe, long-press it.
Which VSCO features are unavailable for Android users?
VSCO does not support all features in the Android app. DSCO, Journals, RAW support, Split Focus and Exposure Tool, White Balance Lock, Low Storage/Memory Warning, and Advanced Camera Controls are currently unavailable.
Reviews and reaction from VSCO users
“I’ve been using VSCO for many years now, and I love it. Their presets are amazing, and the “look” VSCO has even persuaded me to upgrade to the full version.”
“I absolutely love VSCO and use it for all of my photography. The range of creativity, inspiration and options it provides is incredible.”
“I use this to edit all my photos, and I love it; I’m also a VSCO X member, and I recommend it for everyone.”
What is the difference between VSCO and Lightroom?
The most significant difference between VSCO and Lightroom is its extensive library of presets and filters. VSCO has ten default presets that are free to download. There are many more for members. Lightroom offers only five basic presets but has more flexibility for DIY filters.
Lightroom has more advanced editing tools but takes a bit of time to get used to. VSCO is easier to understand and faster to master because of all the presets in the app’s paid version. It depends on what kind of photographer and editor you are. Another factor is what type of cellphone you use to take your images. Apple devices work perfectly, but the Android app is missing quite a few features for some reason.
For users of Instagram, VSCO is the go-to app for quick editing and great results. Even video editors can use the application to get the best results for stunning short videos.
Is VSCO worth it?
When you are an iPhone photographer, the VSCO app is excellent for the price they are asking. So VSCO is worth the monthly description. If an Android device is your preferred camera, we recommend you choose Lightroom or Snapseed over VSCO.
Summary
That’s it, our top 3 photo editing apps for Android and iOs. It’s hard to say which one is our absolute favorite. We use all of them to get the best possible results. The best thing is, you can use Lightroom Mobile, Snapseed, and VSCO for free to give them a try. If you don’t want to spend any money, combine Lightroom Mobile free version with Snapseed, and you are pretty much alright.
Stick to a specific look and feel if you want to share your photographs on any social media platform. Your growing followers group will appreciate and recognize your work from a distance. You can read more about creating an amazing Instagram feed in our blogpost. I recommend using a tripod and remote shutter to take stunning images with your phone. You can find all my favorite gear on the recommended gear page of this website. Don’t forget to clean the lens to get the sharpest results.
We wish you luck and joy in editing your images.